How to Create a professional website on Blogger for free? Is it possible to create a good website on Blogger?
If you are looking for answers, then you are on the right website. This article will share the complete guide on how you can create a professional-looking website on blogger for free.
From creating your blogger.com account to make a good-looking responsive website, I have gone through each step.
So, even a complete beginner can understand and learn about how to create a blog on Blogger.

Before we start, some of you might be thinking that is it okay to start a blog on Blogger, or should you start in WordPress?
The answer is yes, it is definitely okay to start on Blogger. As a matter of fact, this website itself is hosted in Blogger.
And as a beginner, you should definitely try blogger because of its simple interface. Now that your doubt is solved, let's start the guide for creating your professional website on Blogger.
Step 1: Sign In to your Blogger Account

The first thing you need to do is to go to blogger.com and click on the "Create Your Blog" button.
Then you need to sign in to the google account that you want to use for your blogging profile, I recommend using a different Google account rather than your personal one.
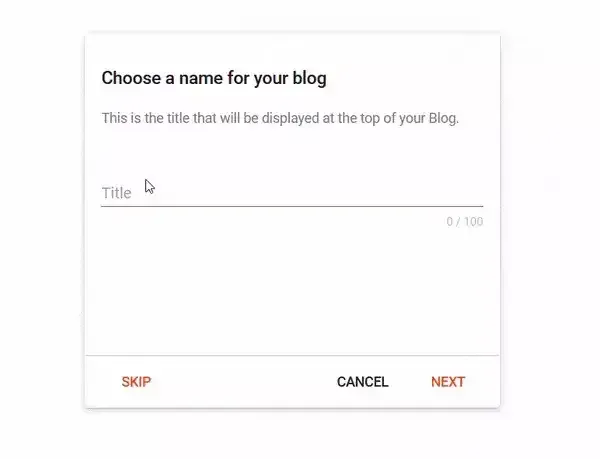
Once you sign in to your Google account, you have to enter the name of your blog. After that, you have to choose the URL for your blog.
As you create your blogger website, you will create a subdomain for blogspot.com (You can connect this with your purchased domain later). You have to choose a URL that has never been used.
Once you are done choosing the URL, click on "Next" and then write the name you want to show on your blogger profile and click "Finish".
You can see the animation below in case you are still confused.
Step 2: Set Up Your Blogger Website
After creating the blog, you should take a little time to check different options in the blogger dashboard. You have to set up your blog before proceeding further.
Choose Blogger Theme
One of the most important things in a blog is how it looks, so you need to customize your default blogger theme. So, how can you get a professional blogger theme?
The answer is Blogger provided it for you for free. There are multiple themes available in blogger for use, for example, the "Notable" template is definitely a very good start.
If you want a more advanced theme for your blog, you can check out different theme-providing websites. There are hundreds of blogger templates available on the internet.
For a start, you can check Sora Templates, they have a huge collection of blogger templates and the good thing is most of the templates have the free version available. So, you can take some time and choose a good theme for your blog.
After downloading your desired blogger template you have to upload it. For that, you have to go to the themes section in the blogger dashboard.
Customize Your Blogger Theme
After installing your blogger theme, you have to customize it. So, you have to go to the Layout Section, delete the unnecessary widgets, and add the widgets you want in your blog.
This part is very simple in Blogger, cause Blogger already has many widgets ready for use, you just have to click on add a gadget and then add the widget you need.
If you want to change your theme's color, you have to go to the Theme Section and click on the Customize button. Here you can customize the color of the different sections of your blog.
You can set the background color of your blog and choose the main color theme of your blog. Spend some time customizing your blog, it will make you more comfortable with the Blogger dashboard and how it works.
Create and Upload Favicon in Blogger
Ever heard of Favicon before? Don't worry favicon is like a logo, that you see on the browser tab when you open any website.
Even though a favicon does not directly affect the blog or its performance, a favicon still gives your blog a professional look. So, create one for you.
You have to create a square image, with some icon or letter suiting your blog title. For example, you can check the favicon of Google. You can easily create a favicon using any photo editor or Canva or online Favicon creators like this one.
After that, you have to go to the blogger settings and you will find the favicon button just above privacy settings. Tap on the Favicon button and upload your Custom Favicon.
Step 3: Add Important Custom Pages
Now that you have completed setting up your blogger theme, the next thing you have to do is to create some important pages.
This step is very important, and you should do this at the very beginning of your blog. The pages you need to create are - Contact Page, Privacy Policy, and Disclaimer.
You can also add pages like About Us or Sitemap. Creating a sitemap page helps Google bots to crawl your website fast.
If you don't know what to write in your privacy policy or disclaimer, you can check our website's policy pages and get the basic idea.
You can also use Privacy Policy Generators available on the internet to create Privacy Policy for your website.
Step 4: Do Basic SEO in Blogger Website
The next step is to do the basic SEO or Search Engine Optimization of your blog. SEO helps your website to rank on search engines like Google, Bing, and Yahoo.
Even though SEO is something you have to do all-time (as long as you are blogging), you should do the basic SEO setup in the blogger blog before connecting it with the custom domain.
Make Blog visible to Search Engine
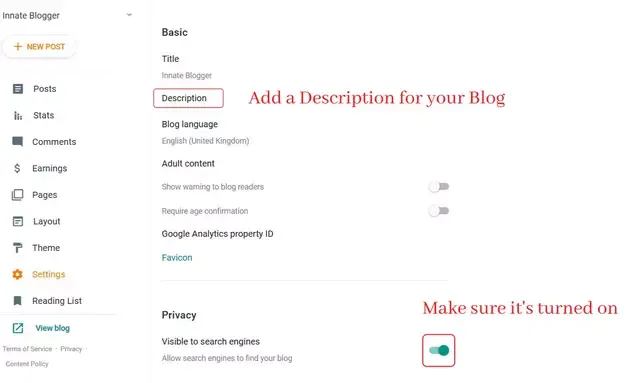
To do the basic SEO of blogger, you have to go to the blogger settings and then write a good description about your blog.
Meanwhile, make sure that the "visible to search engine" option is turned on in the privacy settings.
Add Meta Description in Blogger
Now you have to scroll down up to the Meta Tags option. Make sure to turn on the "Enable Search Description" option and add a good search description below.
This is very important and this is also called the meta description of your blog. It will appear below your blog URL when someone searches your blog name in google or any other search engine.
So, make sure to write a good meta description including the keyword or topic you want to target within 150 words.

Crawlers and indexing Settings in Blogger
For the next part, you have to scroll down to Crawlers and indexing settings. Enable both custom robots.txt and custom robots header tags, after that you have to add the custom robots.txt.
You can also add custom robots.txt after you connect your blog with a custom domain. All you have to do is click on custom robots.txt and then add these lines. (Make sure to change the domain name)
User-agent: *
Disallow: /search
Allow: /
Sitemap: https://YourDomain.com/sitemap.xml
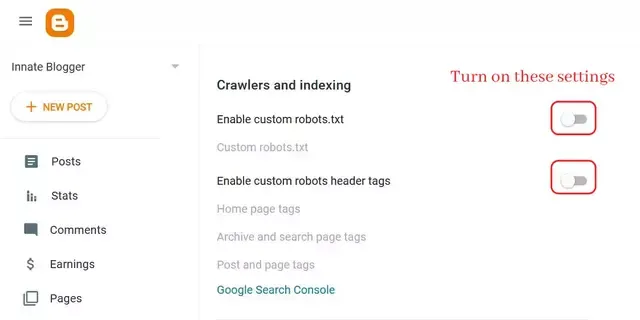
After adding custom robots.txt, you have to add custom robot header tags. This may seem a little confusing, so just do as I say. Only enable these tags category-wise.
- Custom robot tags for the home page: all, noodp
- Custom robot tags for archive and search pages: noindex, noodp
- Custom robot tags for posts and pages: all, noodp
And that's it, the basic SEO of your blogger blog is complete.
Step 5: Connect a Custom Domain to Blogger Blog
I know that I said you can create a professional blogger website for free, which you can already create by following the previous steps.
But, if you really want your blog to have that professional feeling you should definitely connect it with your custom domain.
Cause custom domains definitely rank higher than Blogspot sub-domains, and it is necessary if you want to create a brand value for your Blog.
Also Read, How to Choose a Good Domain Name for your Blog?
So, the first step is to buy a custom domain which you can buy directly from Google Domains or from any other domain registers like GoDaddy or Namecheap. After buying the domain, the next part is to connect it with your blogger blog.
So, go to blogger settings and then scroll down to Publishing settings, then click on the "custom domain" option and type the domain name.
Make sure to add www. before the domain name like this "www.innateblogger.com" and then click Save.
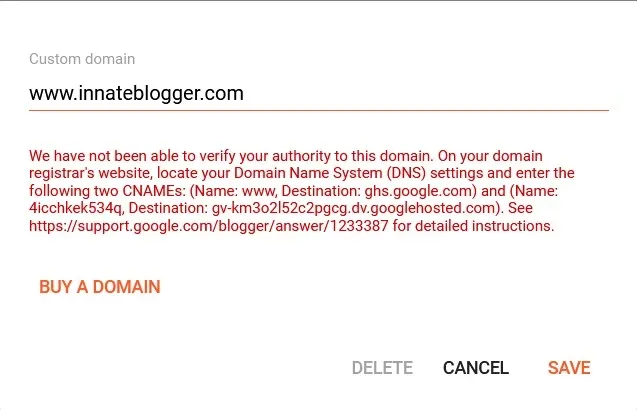
You will see a red error stating "We have not been able to verify your authority to this domain....", don't close the tab and open the domain registrar's website in a new tab.
Sign in to your account and then go to the DNS settings of the domain you bought. Now you have to add 2 CNAME records and 4 A records in the DNS settings.
You will find the CNAME records in the error that you saw previously while saving the custom domain name. Make sure to copy and paste them correctly while adding them as new records DNS settings.
If you are in GoDaddy, you have to add them like this.

Next, you have to add these 4 A-records.
- 216.239.32.21
- 216.239.34.21
- 216.239.36.21
- 216.239.38.21
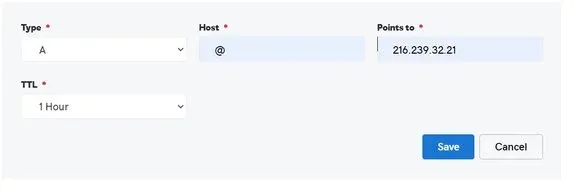
After adding all these DNS records, come back to the blogger dashboard and once again add the custom domain name and click save.
And that's it, your blog is now connected with a custom domain. It takes little time to completely connect the domain with the blogger blog.
If it still shows an error after saving, then wait for some time and try again.
Meanwhile don't forget to enable the HTTPS availability Option. HTTPS is a must for websites nowadays, but the good thing is Blogger provides it for free.
So, you must enable the HTTPS availability Option.
Step 6: Submit Blogger Website to Google Search Console
After completing all these previous steps, you can see that your professional website is ready and good to go, so this is the bonus step that you should do.
You have to visit the Google Search Console and click on start now.
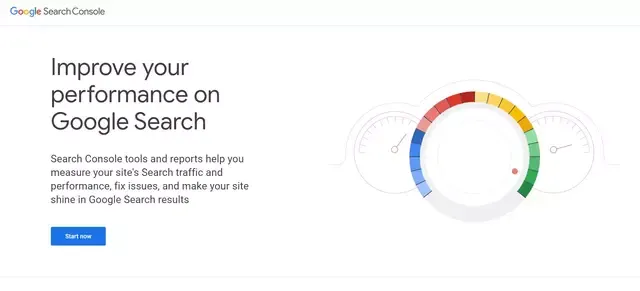
After that, you have to sign in to the search console with the same google id that you used for creating your blogger account.
Write the domain name you bought in the domain section without any www or HTTPS, just like this.
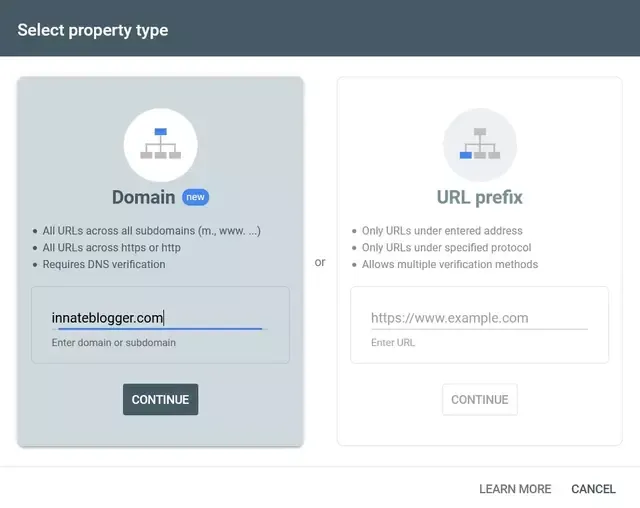
After that just click on continue, you will see a message stating "Ownership auto verified", is one of the plus points of using Blogger.
As Blogger and Search Console both are provided by Google, you don't need to verify it using DNS, it automatically verifies your ownership.
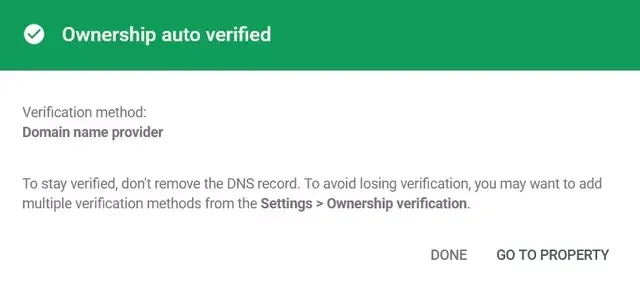
And that's it, your website is submitted to the Search Console, so it will be available in Google search after few days.
With this, all steps are completed, so now you just have to write some amazing content for your blog and enjoy the journey of Blogging.
Summary
Steps to follow, for creating a professional website on Blogger:
- Sign In to your Blogger Account
- Set up the design of your Blog
- Add Important Custom Pages
- Do Basic SEO in Blogger Website
- Connect a Custom Domain to Blogger website
- Submit Blogger Website to Google Search Console