If you are new to blogging, you might feel overwhelmed by the many options and features that Blogger offers.
But don't worry, in this guide I will walk you through the different sections of the Blogger dashboard and explain how to use them to create a great blog.
Blogger is a popular platform for creating and managing blogs. The Blogger dashboard is where you can manage your blog, create and edit posts, change your settings, and more. You can access the dashboard by logging in to your Blogger account and clicking on the name of your blog.
The Blogger Dashboard Overview
The first thing you need to do is create a Blogger account and start a blog. Once you have done that, you can log in to your Blogger dashboard. The dashboard consists of several sections, which we will explain in detail below.
Note: I have added many pictures with detailed labels in this post to help you understand better. So, don’t rush. Take your time to look at the pictures as you read. Enjoy!
Posts
This is where you can create, edit, and publish blog posts. This section shows you all the posts that you have published or drafted on your blog.
You can create a new post by clicking on the orange "New post" button, or edit an existing post by clicking on its title. You can sort posts by Published, Drafts or Scheduled.
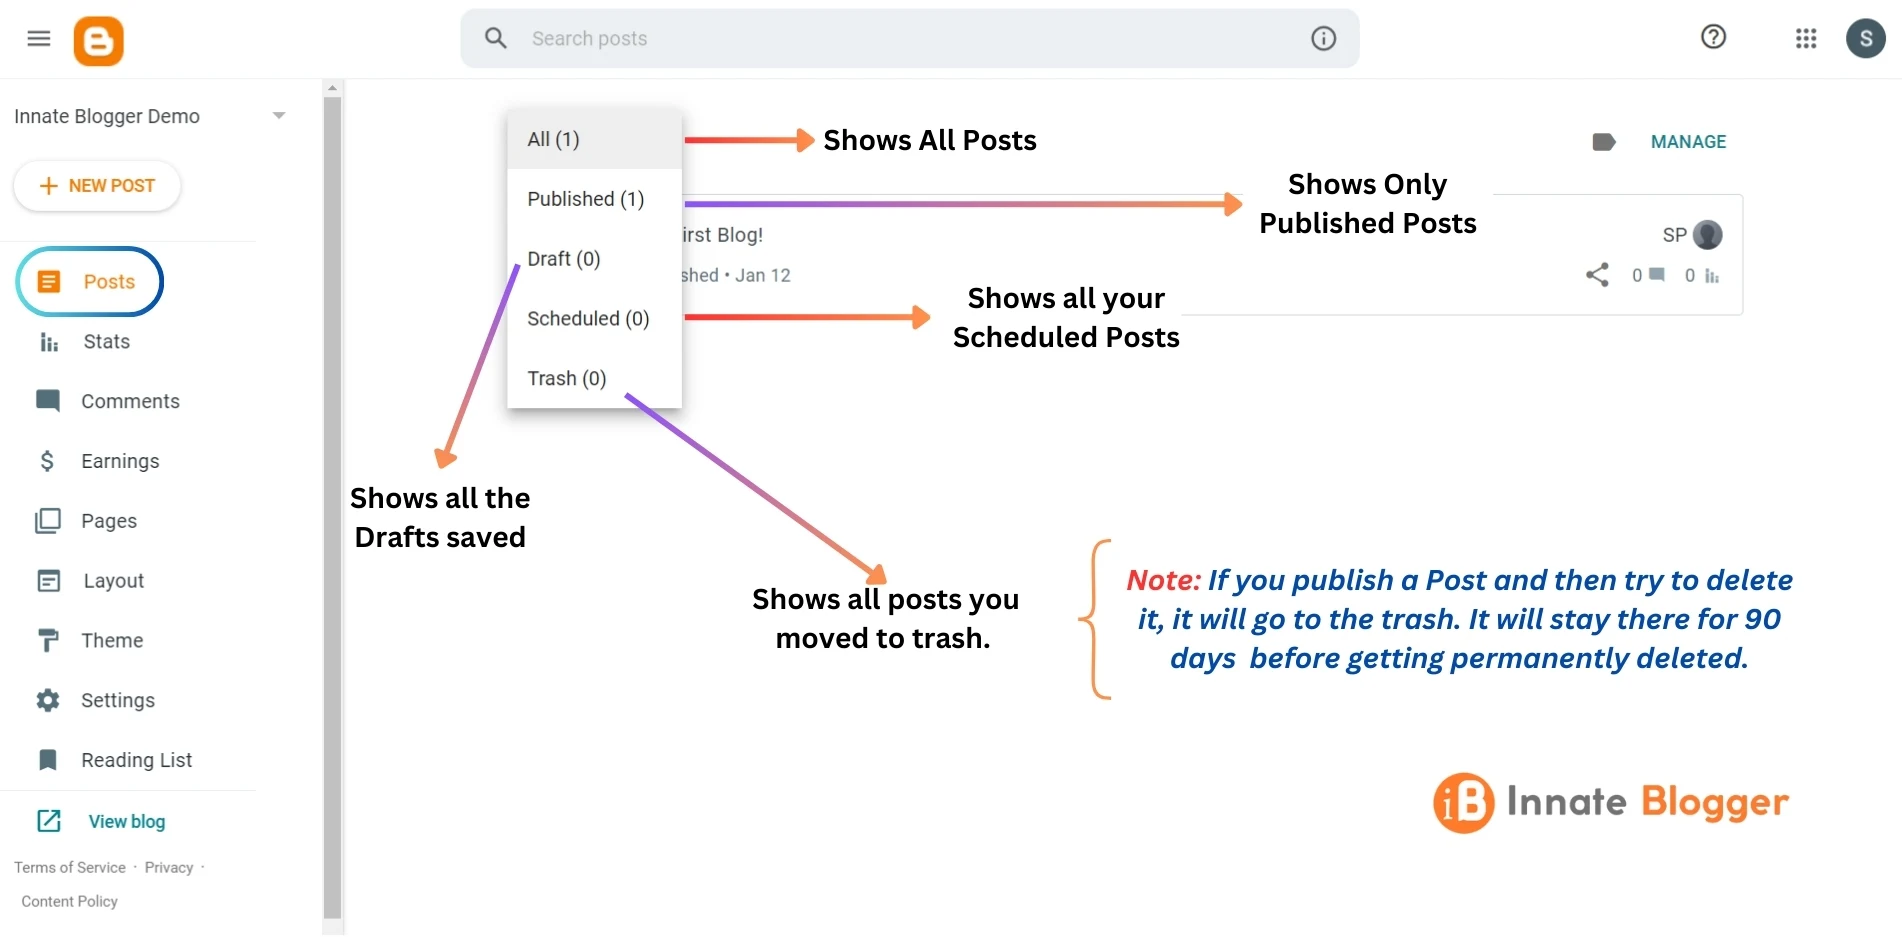
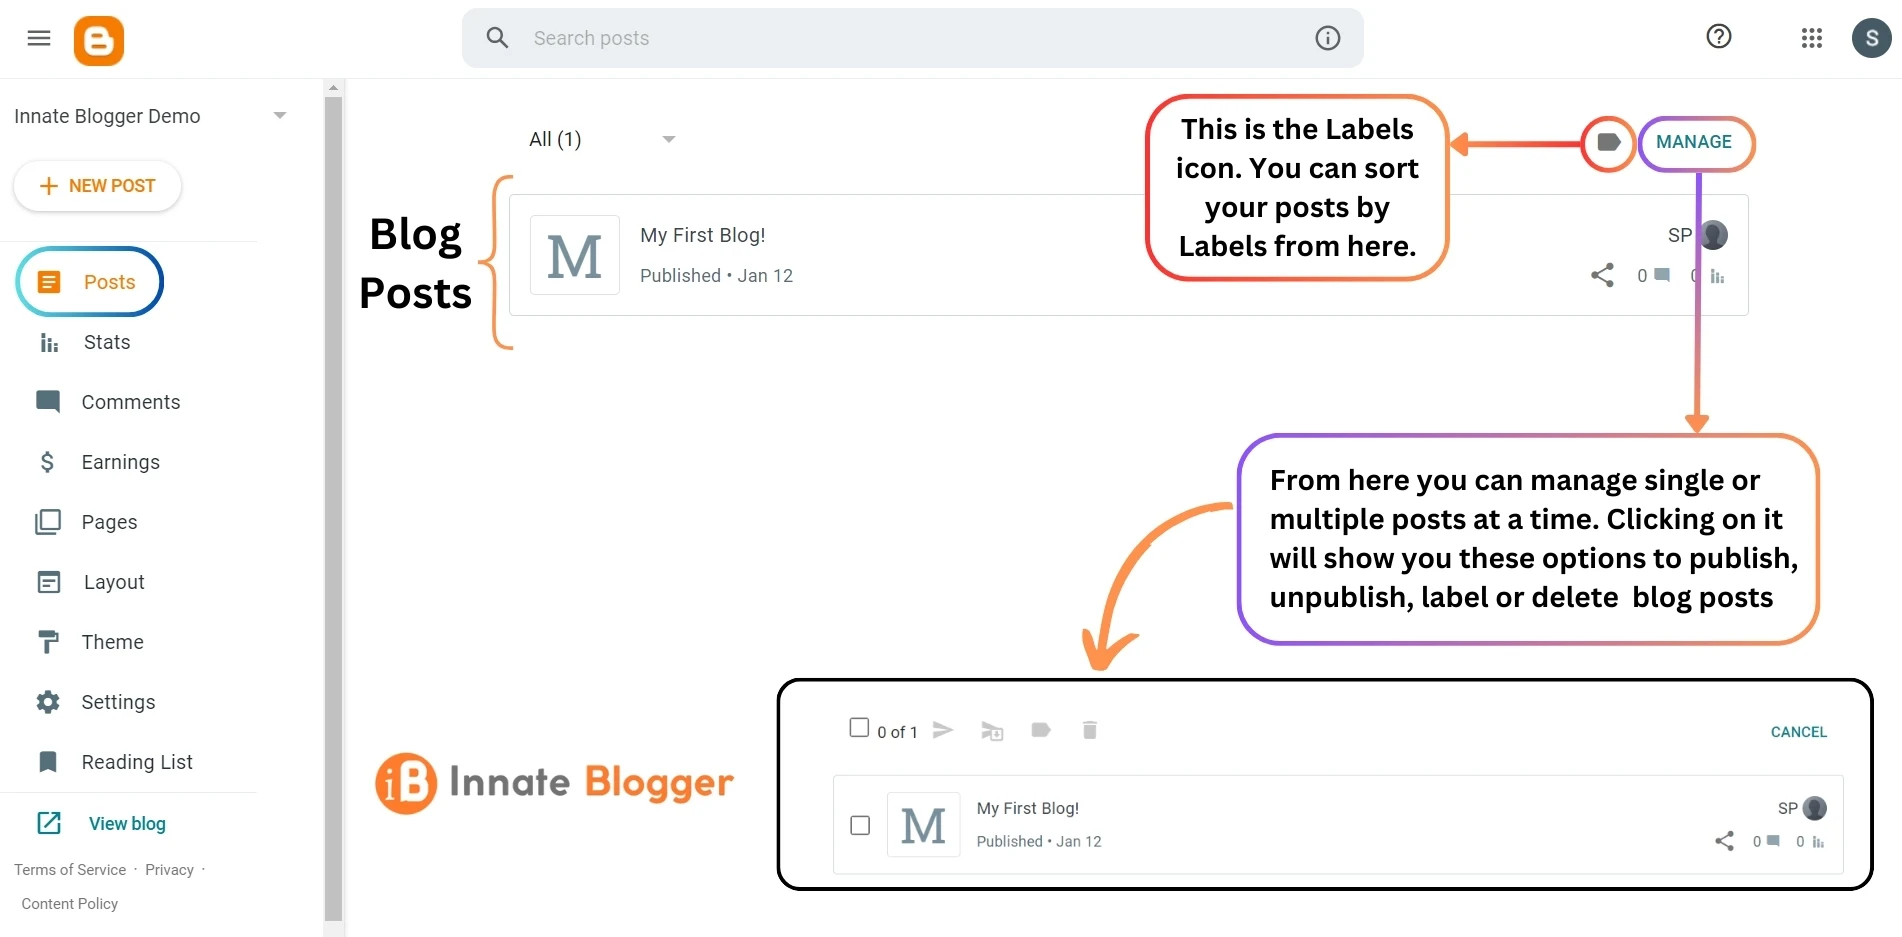
You can also delete, label, or share your posts from this section. Check the image below to get a visual idea about this section.
Stats
This section provides you with detailed statistics about your blog's traffic, such as page views, audience, sources, and keywords. You can view your stats by day, week, month, or all time.
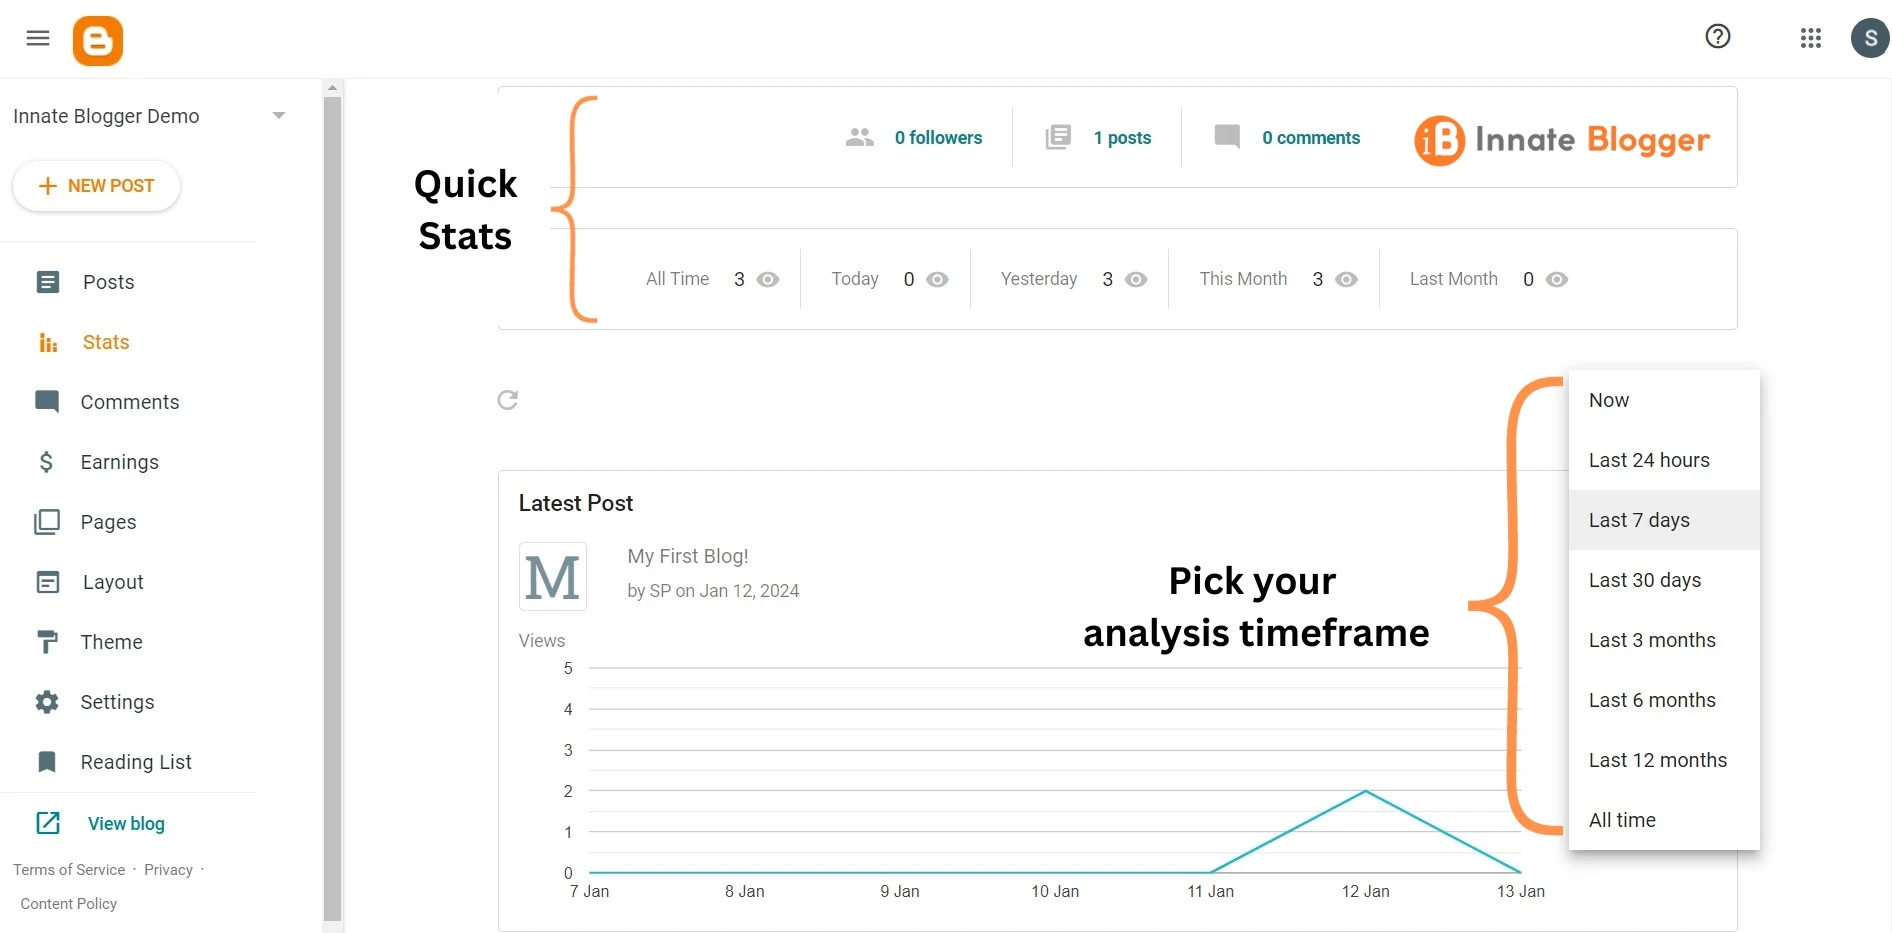
Initially the Stats section doesn't have much to show, because your blog is still not getting any page views. But, as your blog starts to get more and more views then, stats will become one of the most important section of your dashboard.
If you scroll down a little, you will see the chart of daily page views of your blog, most popular posts and pages of your blog and their page views in time frame you selected.
Under the daily page views chart, you will see an orange button saying, "more about this blog", if you click on it more detailed statistics will be shown. In this page, you will be able to see top referring websites and their URLs, on what keyword your website is ranking.
Also, you will be able to check where's your blog audience is from and what browsers they are using, so that you better optimize your content for your audience.
Comments
This section displays all the comments that your readers have left on your blog posts. You can moderate your comments by approving, deleting, or marking them as spam.
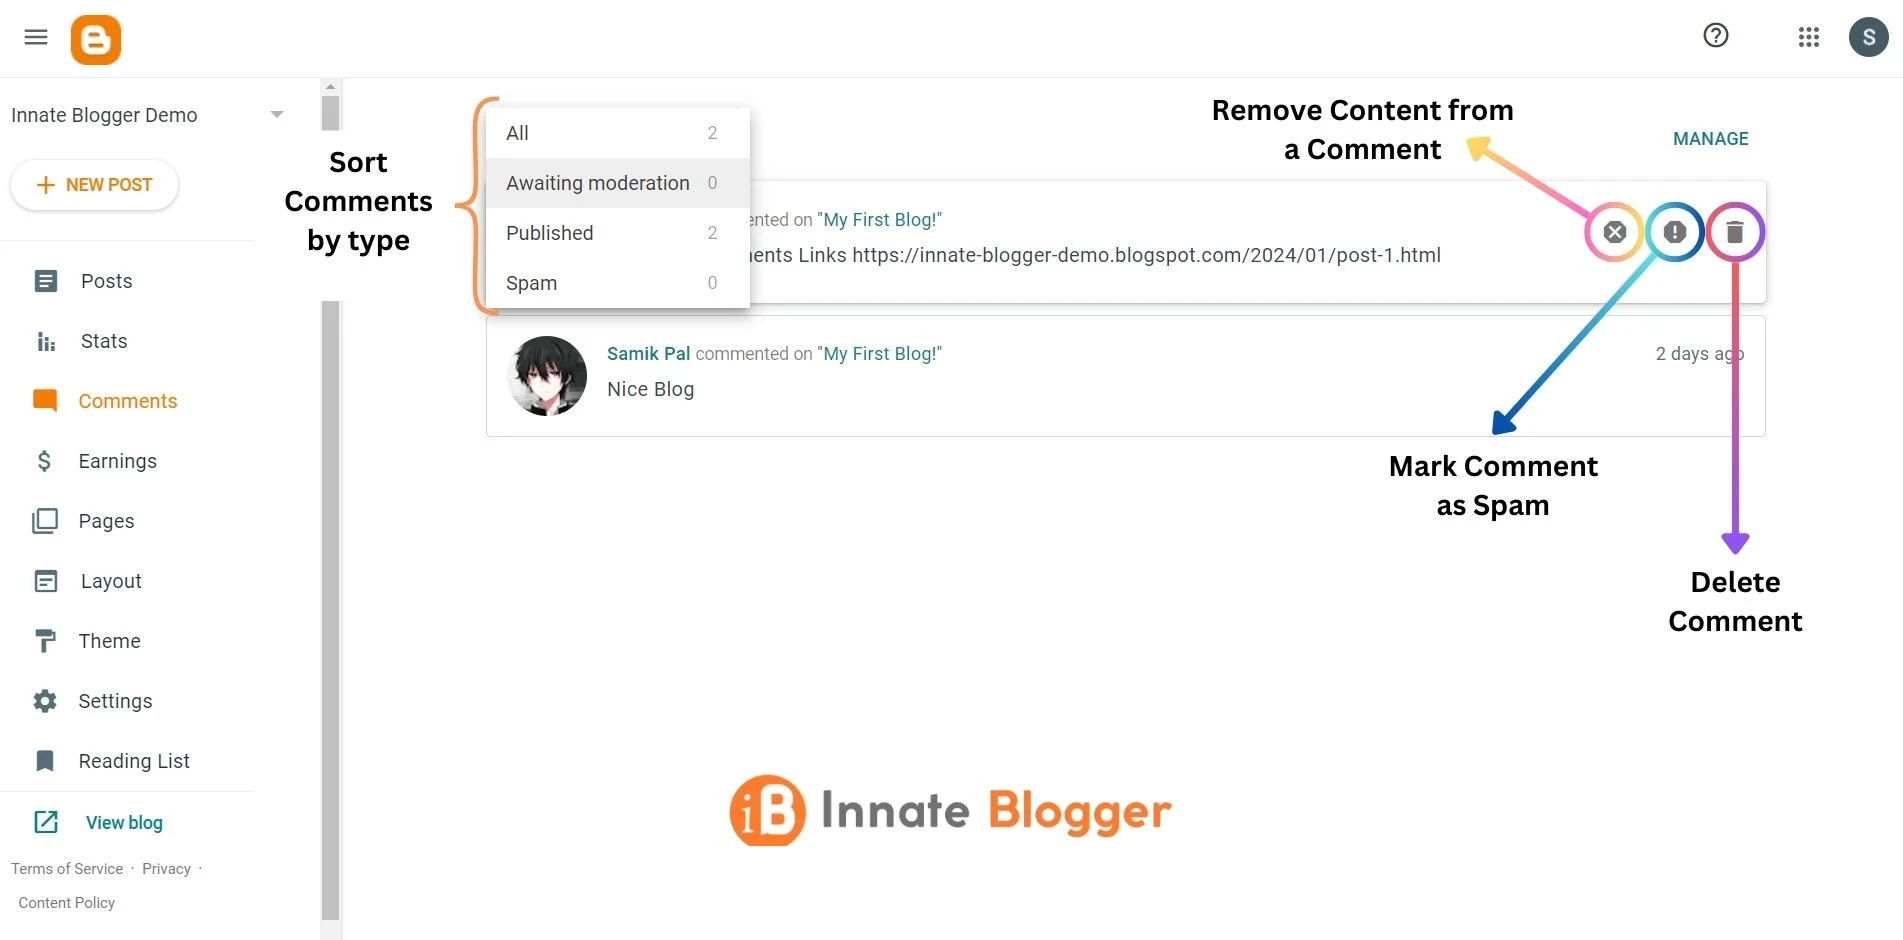
You can choose how to manage the comments on your posts. The default option is to allow all comments without moderation. However, you can change this option from the settings if you prefer to review every comment before it appears on your site.
Blogger has a smart system that can filter out spam comments automatically. You can also take action on comments yourself, such as marking them as spam or deleting them.
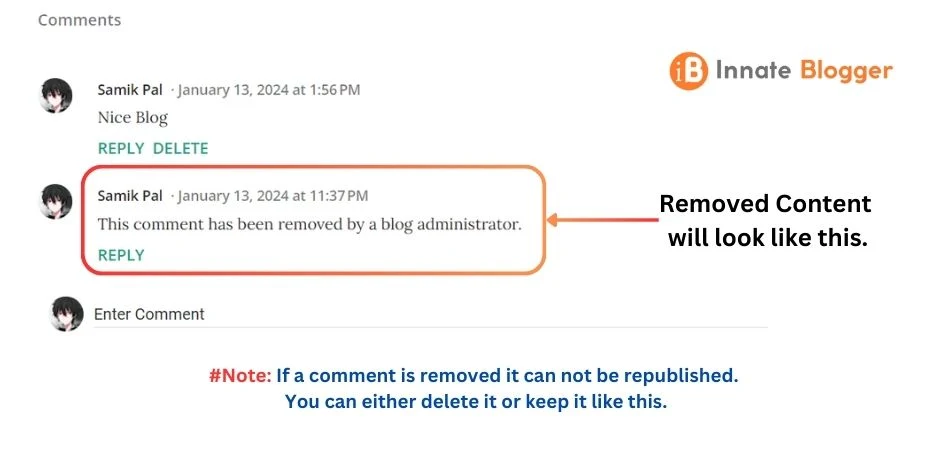
If you want to remove the comment content, you can do that too. The comment will then display "This comment has been removed by a blog administrator." instead of the original text.
Earnings
This section enables you to monetize your blog with Google AdSense. AdSense is a program that allows you to display relevant ads on your blog and earn money when your readers click on them.
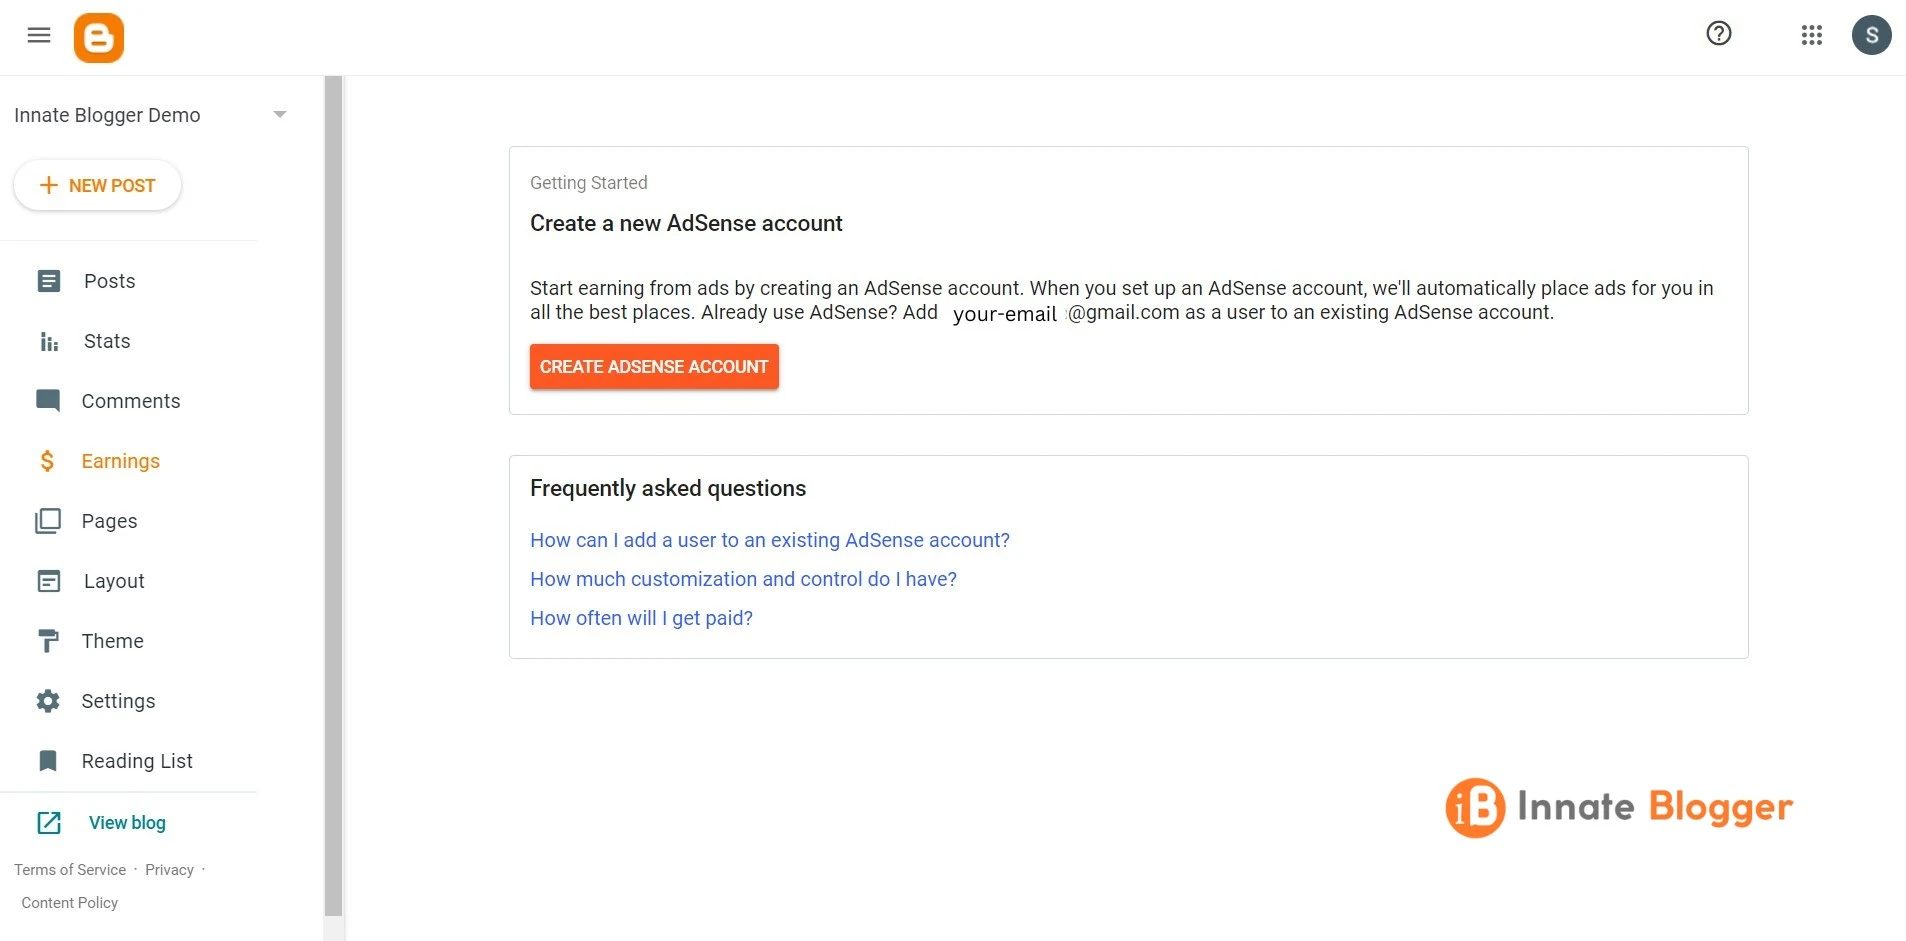
You can sign up for AdSense by clicking on the "Create AdSense Account" button, or connect your existing account by clicking on the "Connect AdSense" button. You can also insert AdSense script code directly in your Blogger theme and skip this section completely.
Pages
This section allows you to create static pages on your blog, such as About Me, Contact, or Privacy Policy.
Pages are different from posts because they don't have a date or comments, and they are not displayed on your blog's main page.
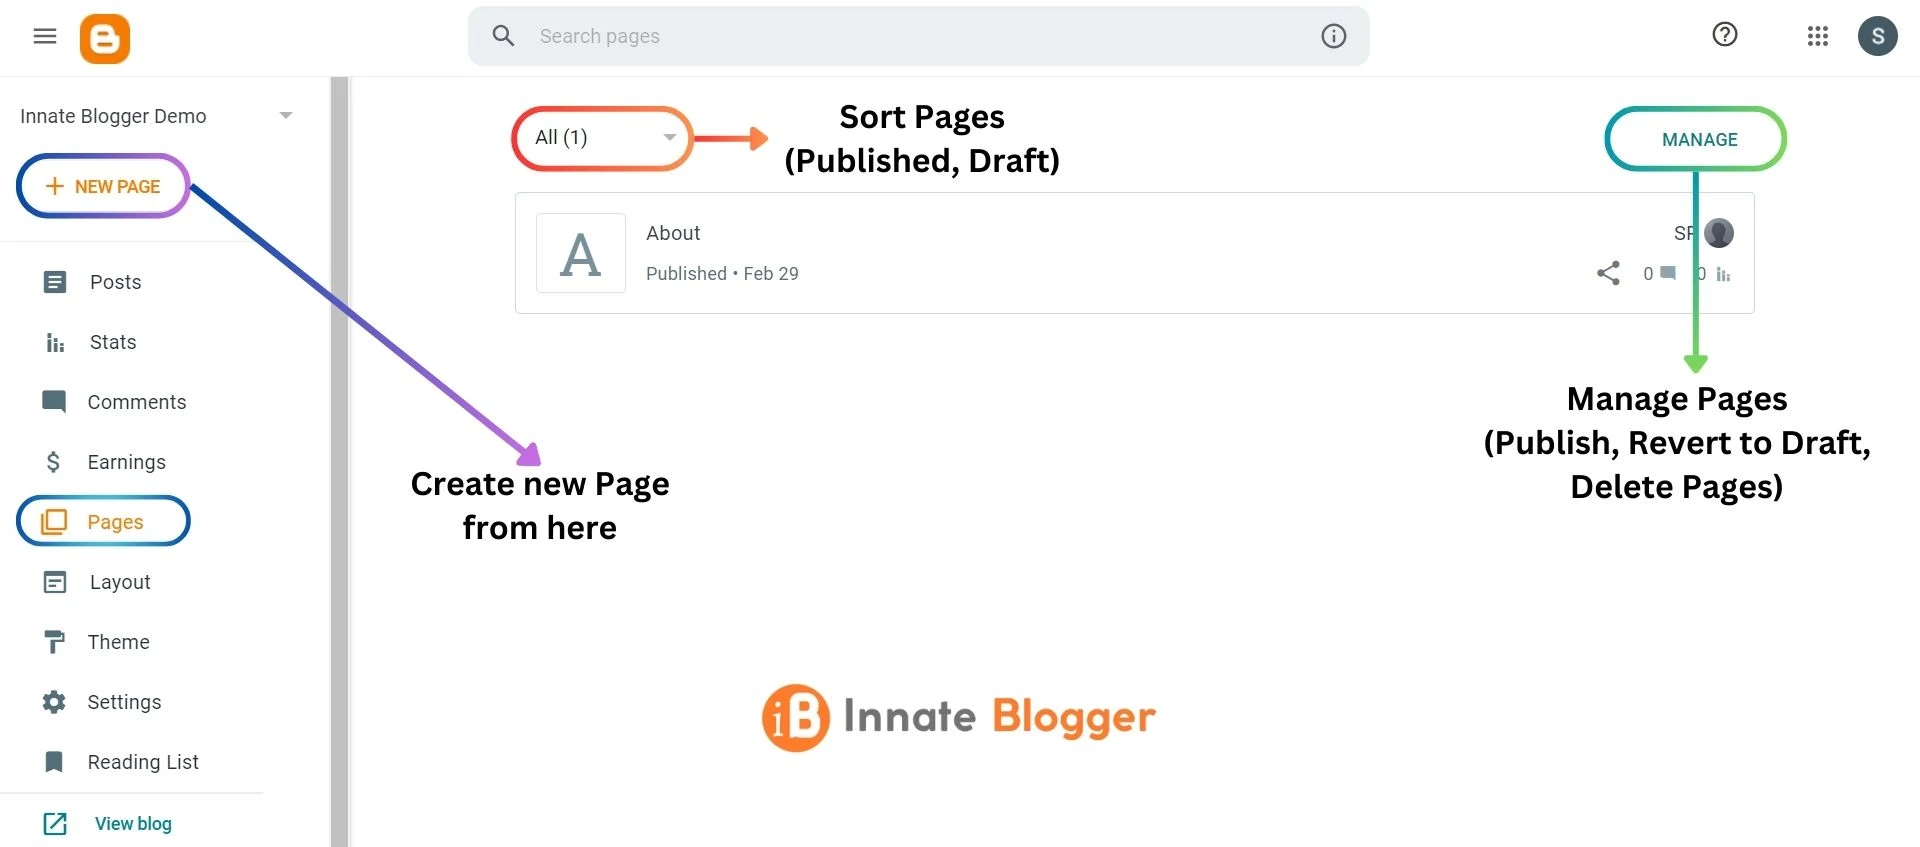
You can create a new page by clicking on the orange "New page" button, or edit an existing page by clicking on its title. You can also delete or share your pages from this section.
Layout
Blogger Layout Settings are the tools provided by Blogger that allow you to customize the appearance and functionality of your blog. These settings let you control customize the appearance of your blog, such as the header, footer, sidebar, and main blog area.
There's a lot of option in the layout section, spend some time by clicking on different options and edit them as your preference. Trust me, it's super easy!
You can Add, remove and edit gadgets on your blog. Rearrange gadgets by dragging and dropping them to different sections of your blog.
Blogger has a lot of Gadgets. If you click on add a gadget button, all available gadgets will apear in a pop-up window. You can get a quick view of all gadgets from below.

Among all these, my personal favourite is HTML/Javascript gadget. With this gadget you can easily add custom JavaScript in your blog, which gives you a better control on your blog design and functionality.
Theme
The Themes section in the Blogger Dashboard is where you can customize the look and feel of your blog. You can choose from a variety of themes that Blogger offers, or upload custom theme.
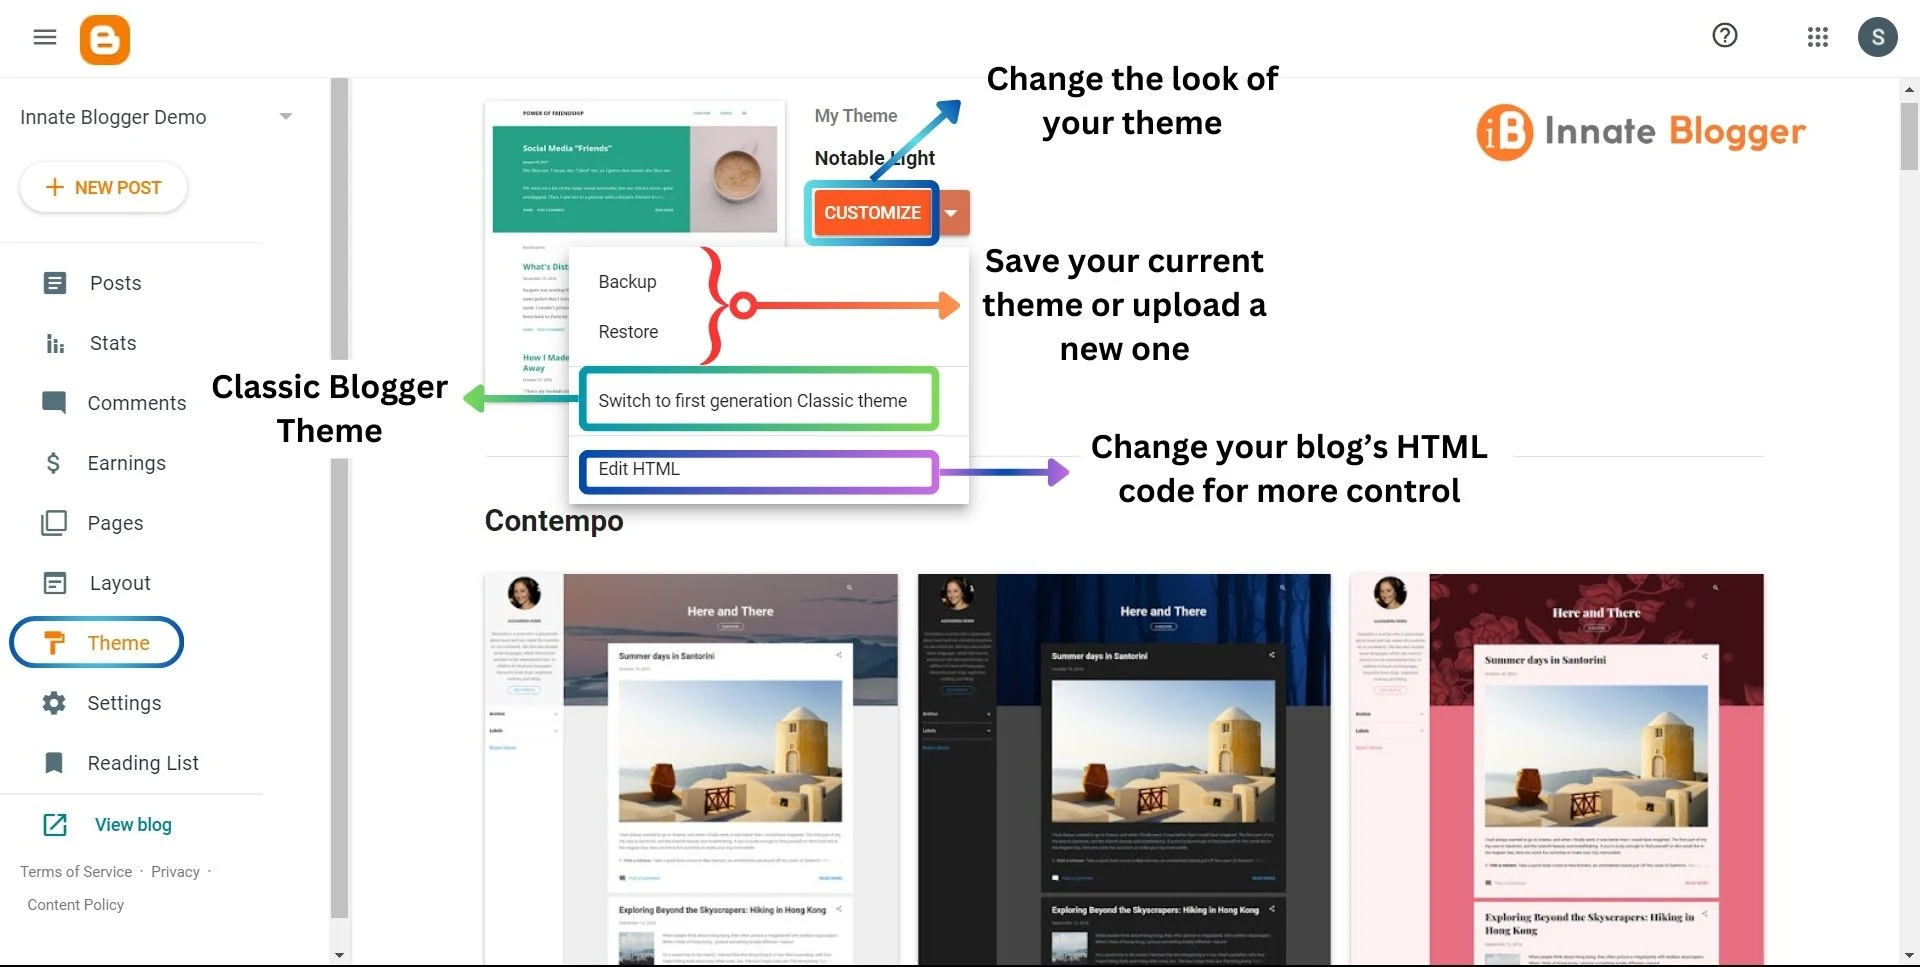
You can also edit the HTML and CSS code of your theme from this section. Here’s a simple explanation of what you can do in this section:
-
Themes: Pick a theme from Blogger's collection. Before you apply a theme or any changes, you can preview them to see how they look.
-
Customize: Change the look of your theme. You can change the background, adjust widths, modify colors, and more. You can also edit details like font style. from here.
-
Backup/Restore: This option allows you to save a copy of your current theme (Backup), or upload a previously saved theme (Restore). It’s useful when you want to try new things without losing your current setup.
-
Edit HTML: This is for advanced users who know HTML. You can directly change your blog’s HTML code. This gives you more control over your blog’s design and functionality. Be careful with this option as incorrect code can cause issues.
-
Mobile: Decide how your blog looks on phones.(This option is available in custom themes)
Settings
Settings contains various options and preferences that affect how your blog works and behaves. There's a lot of options in Blogger dashboard settings.
If you're new to blogging and have chosen Blogger as your platform, understanding its settings is crucial for creating an engaging and user-friendly blog. The following in-depth guide will help you understand about different blogger settings in a simple way!
-
Basic & Privacy
The Basic Settings allow you to manage the title, description, language and privacy of your blog. You can also add Favicon for your blog here and connect your blog with Google analytics. You can also manage your blog's adult content settings here.
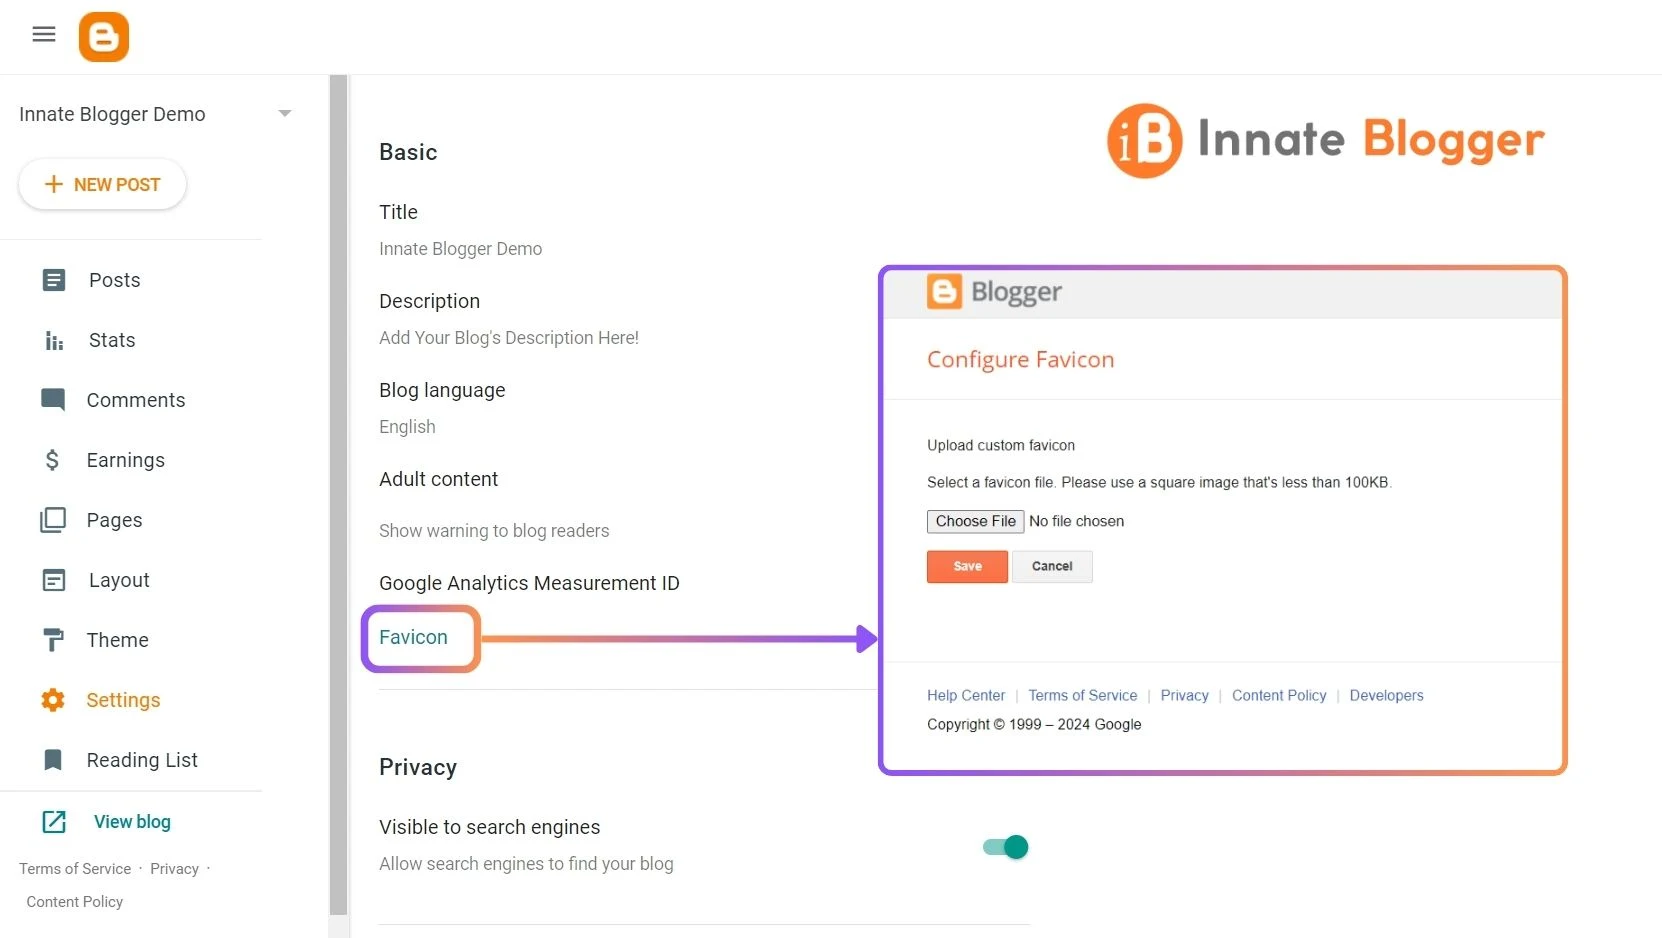
Image: How to add Favicon in Blogger Settings -
Publishing & HTTPS
This part is important in the early days when you are setting up your blog. There's option to change your blogspot address, connect custom domain to it.
Once you connect custom domain in your blog, you will also some additional settings like Fallback subdomain, Redirect Domain and HTTPS avaibility.
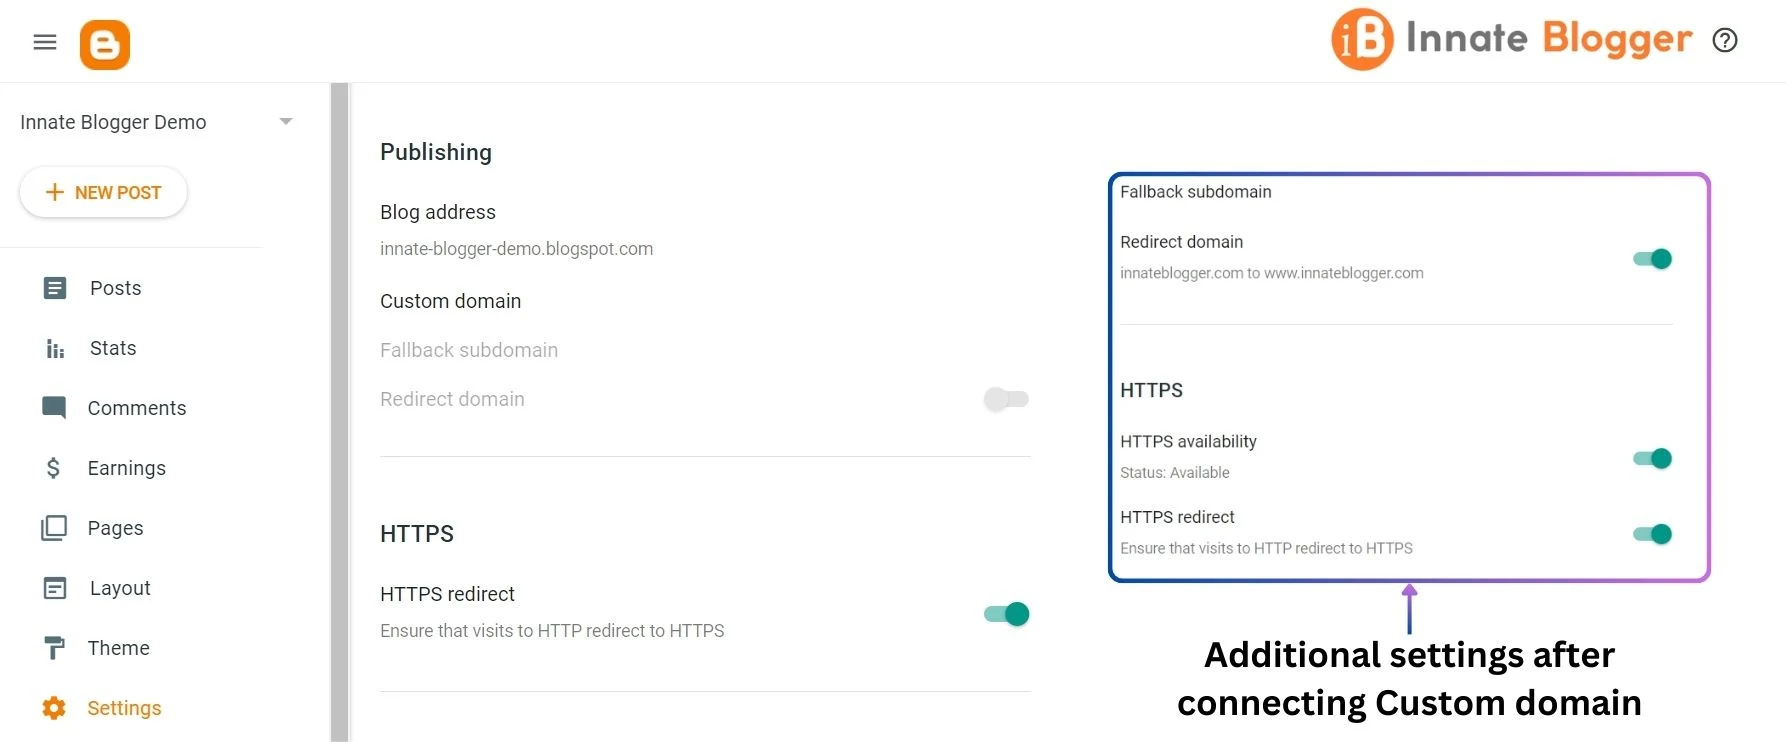
Image: How to use Publishing and HTTPS Settings in Blogger If you are connecting custom domain to your blog, it is important to check the HTTPS avaibility and turn on HTTPS redirection.
If you want to learn more about connecting custom domains in Blogger, then read this: -
Permissions
This is another important settings in your Blog. In this part you invite more authors, add admins and even control access to your blog.
This is the section where you can make your blog private for custom readers, means unless you add someones gmail in the custom readers they will not be able to access your blog even if they have your blog's URL.
-
Posts, Comments, & Email
This section lets you control how your posts and comments are displayed and shared. You can set the number of posts displayed on the main page, enable or disable comments, and manage comment moderation.
You can also find option for Lazy load images and WebP image serving. These options can significantly improve your blog's Page speed, which can help you optimise your blog for better user experience.
In the Email section, you can set up a BlogSend Address to automatically email your posts to a list of recipients. You can also set up a Mail2Blogger Address to publish posts via email.
You can check the complete details about the comments and email settings from the image given below!
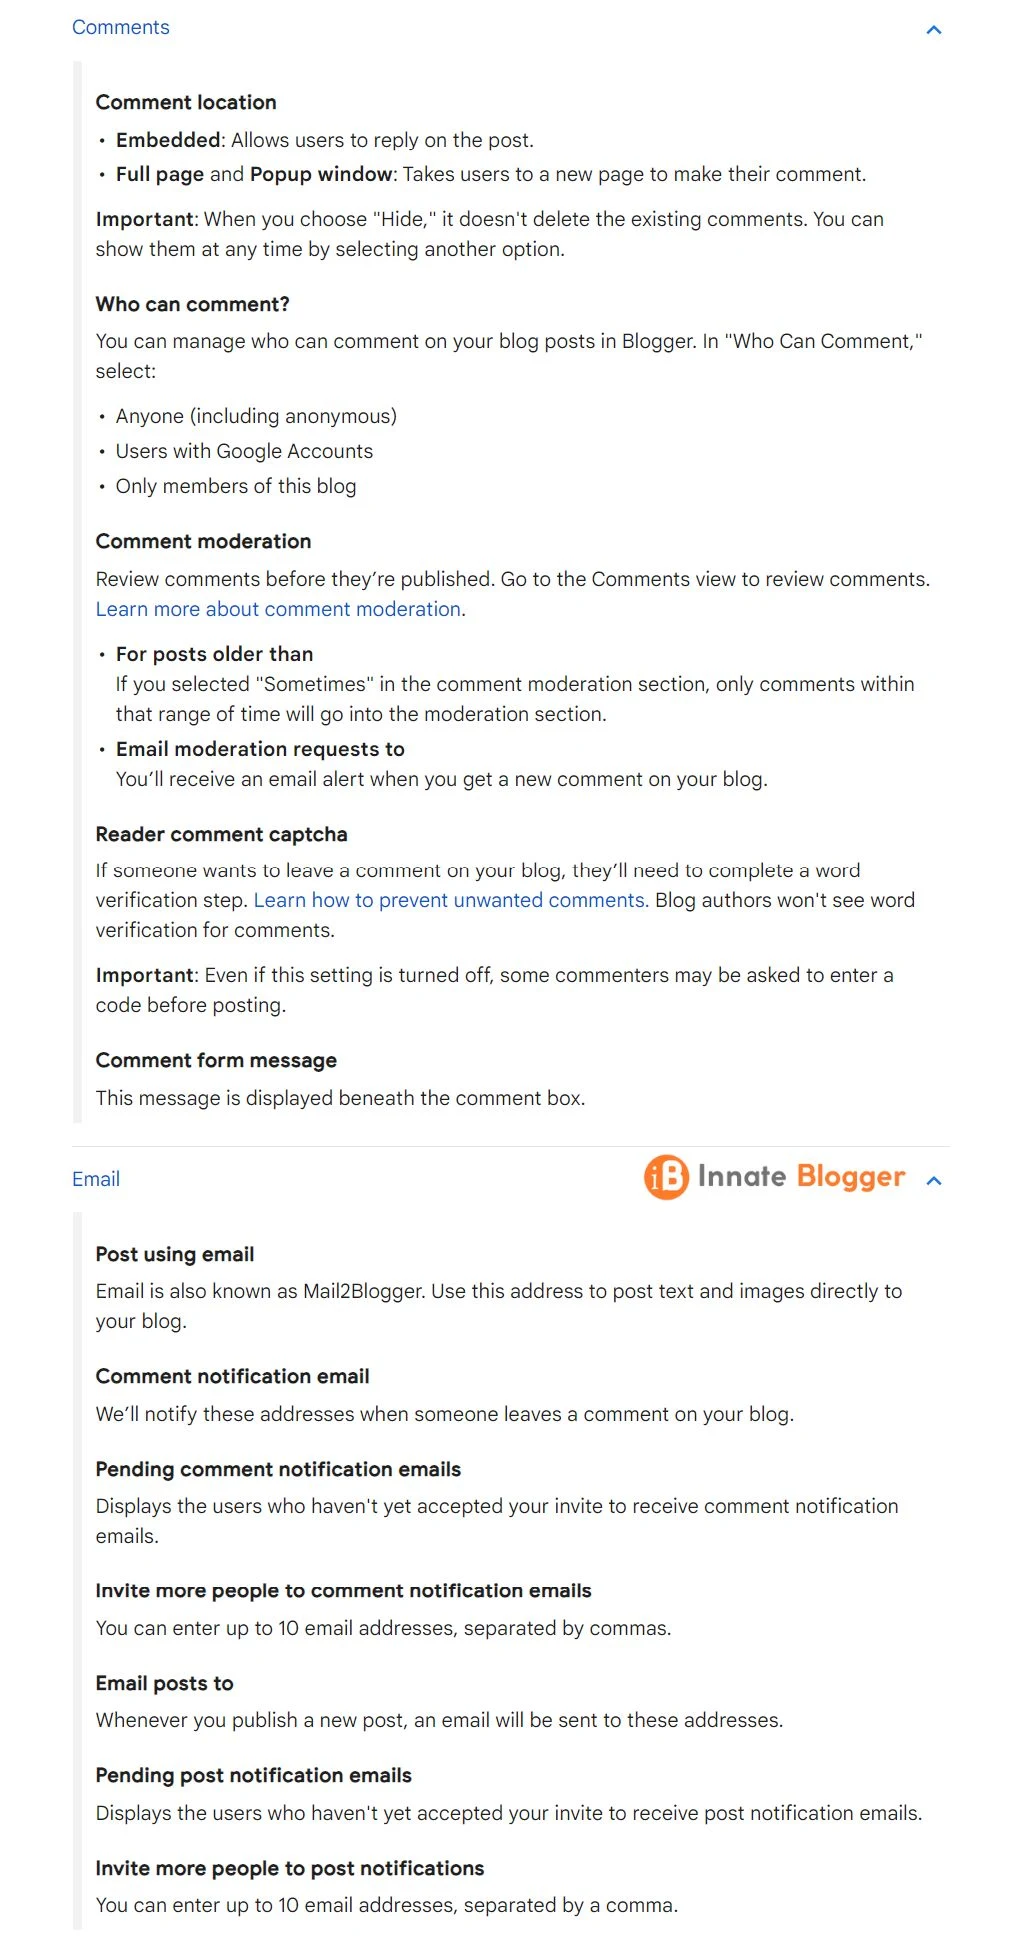
Image: Details about Comments and Email Settings in Blogger -
Formatting
This section is pretty straight forward. Here, you can set the time zone, date header format, and timestamp format. You can also set the comment timestamp format from here.
-
Meta tags, Errors and redirects
Search descriptions are crucial for SEO. Here, you can enable search description setting from here. You can also set the blog's search description. This search description or meta description can help users select your blog in search results by writing a summary of what your blog is all about.
You may want to read this post:And here's the details about the Errors and redirect settings:
Custom 404
Set the blog's 404 page not found message. Enter a message to display on the 404 page instead of the generic message.
Custom redirects
Set the blog's custom redirects. Add custom redirects for URLs that point to pages of your blog.
- From: Add the deleted URL. If the original article was deleted, select Permanent.
- To: Add the URL you want to point to.
-
Crawlers and indexing
Setting up the correct settings for crawlers and indexing in Blogger is crucial for search engine optimization (SEO). The best settings will enable your website to rank more quickly.
In Blogger, Crawlers and indexing status settings remain untouched by default. It doesn't mean your blog won't get indexed, but it will take relatively more time to index your blog posts. Because Crawlers will crawl everything on your website including unnecessary pages like archived pages.
I have wriiten a very in-depth blog post specifically on Crawlers and indexing settings, I highly recommend you to read it from the below link.
-
Monetization
This setting is for adding ads.txt from adsense in your blogger blog. The ads.txt file allows you to specifically identify and authorize resellers of your digital ads inventory in AdSense.
-
Manage Blog & Site feed
In this section, you can import & back up content. You can also access all your uploaded photos and videos from your blog here. And in case you want to delete your blog for some reason, then you can do that too using the remove your blog option here.
The site feed settings gives you multiple options for RSS feed of your blog.
-
General
In the general settings you can edit or view your blogger profile. By clicking on the edit profile option, you can access a new page where you can enter details about you to make complete blogger profile.
You will also see an option to enable blogger draft here. Blogger draft is Blogger in beta version. You can enable it to test new features before they’re rolled out to all Blogger users.
Reading Lists
In this section you can follow other blogs or websites and track their latest posts.
That's it! You have learned the basics of the Blogger dashboard and how to use it to manage your blog.
If you have any further questions, feel free to leave a comment below and I’ll do my best to address them. Wishing you all the best on your blogging adventure. Enjoy blogging!