After creating a Blogger account and setting up a proper blog on Blogspot, it's time to go to the next phase. If you are wondering how to add a custom domain with a Blogspot blog, then this article is just for you.
After creating a blog on blogger, you get a web address on the Blogspot subdomain. So, when you visit your blog, you will be visiting a URL like yourdomain.blogspot.com.
If you want something like yourdomain.com for your URL, you have to buy and connect a custom domain with your blog.
Why is Custom Domain important for a website?
Adding a custom domain is important for your blog. And there are a few reasons for this:
- Branding: Custom Domain makes your blog recognizable. It also makes your blog more professional.
- Trust: Custom Domain names are more trusted than Blogspot subdomains. Because, Blogger being a free platform, is used by many spammers.
- Traffic: Custom Domains are easier to remember and type than Blogspot subdomains.
- SEO: It is better to have a custom domain if you want to do better in Google search. Having a custom domain ensures that you can move to other blogging platforms like WordPress in the future without losing any link juice.
- Backlinks: To be fair, people don't usually link to websites with the Blogspot subdomain. So, it is better to have a custom domain name for your blog.
- Custom Email address: With a custom domain, you can also create a custom address (like: support@yourdomain.com) for your website. It makes you more professional.
After knowing the importance of having a custom domain, it's time to learn how to connect one with your Blogspot blog.
How to Connect Custom Domain with Blogspot Blog
Even though it might seem tricky, but it's actually very easy. Once you learn to connect your first Blogspot blog with your custom domain, it will be a walk in a path for other blogs.
So, let's start the guide.

The first thing you need to do is to buy a domain name for your website. Now, if it's your first time buying a domain name, then you can read our guide on how to choose a domain name for your blog.
I recommend reading the guide and decide the best domain name for your blog.
Once you choose the domain name, go to any domain registrar like GoDaddy or Namecheap and buy the domain. You can buy a .com top-level domain for a year at 11$.
You can also buy cheaper TLDs like .xyz starting from 1$, but make sure you check the renewal price before you buy the domain.
After, buying the domain it's time to connect it with your blogger website. In this case, I will show you how to connect a GoDaddy domain with a Blogspot blog.
But, the procedure is completely the same for other domain registrars like Namecheap, Hostinger, etc. Just follow these steps:
Enter Domain Name on Blogger
First Sign in to your blogger account and then go to the blog settings. Now scroll down a little to Publishing settings.
You will find the custom domain option below the blog address. Click on it, and enter the domain name.
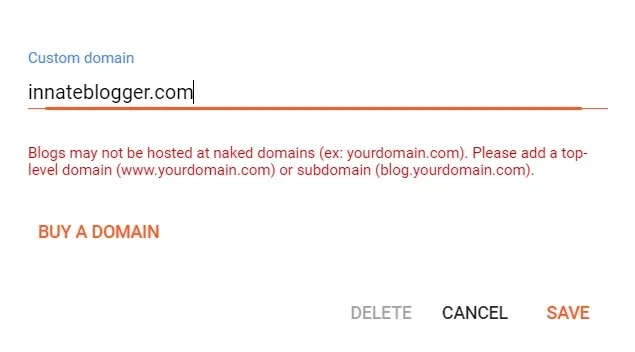
Make sure to add www before the domain name, cause Blogger can't host websites at naked domains. So, it will show an error.

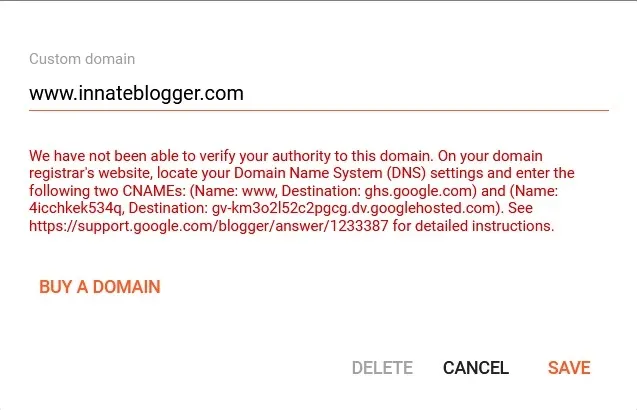
So, add the domain name with www like this, www.innateblogger.com, and then click Save. You will get an error as shown in the image below.

You will need the CNAMEs mentioned in the error for the next step, so don't close the window. Now, it's time to go to the next step.
Add DNS record in Domain
Open a new tab on your browser and then sign in to your domain registrar account. After that, go to the DNS settings of the domain you purchased.
Now you have to add 2 CNAME records and 4 A-records in the DNS section.
Which CNAME records to add?
You will find the CNAME records mentioned in the error you previously encountered while saving the custom domain name.
First, you will have to add the www CNAME records. Now, in most cases, www CNAME is already added in your DNS records with the value of your domain name or @.
So, you need to change the @ with ghs.google.com and then save it.

Next, you have to add another CNAME record, whose Name and Destination are given on blogger error. Make sure to copy and paste them properly.
In GoDaddy when you add a CNAME record, you have to enter the name part in host and the Destination part in value. So, don't get confused because of the different names.
After Adding the CNAME records, you have to add these 4 A-records in your domain's DNS settings.
- 216.239.32.21
- 216.239.34.21
- 216.239.36.21
- 216.239.38.21
Simply add these in the Points to option and add @ in the host section.

Final Steps
After adding all the CNAMEs and A-records, save the DNS settings. Now, once again open the Blogger settings Tab and save the custom domain you previously enter.
If, it still shows an error, then reload the blogger dashboard and once again add the custom domain name and click save.
That's it, your custom domain is finally connected with your Blogspot website.
Sometimes it may take some time before connecting with your blogger website due to a slow DNS change in the Domain registrar. If this happens, don't worry, just try after some time and it will work.
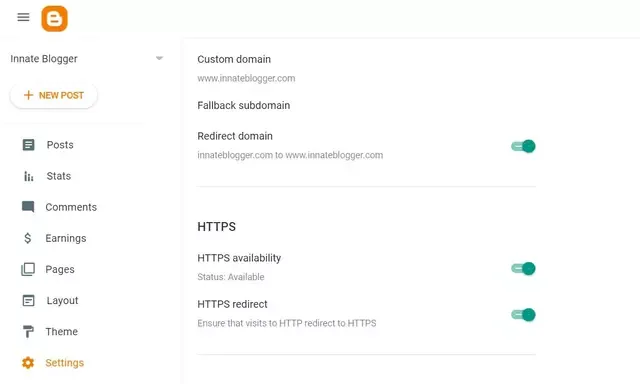
Now, after connecting your domain, you need to enable these settings:
- Turn on the Redirect Domain option. It will redirect all the naked domain requests to your domain URL with the www subdomain.
- Make sure to enable the HTTPS option. Blogger provides a free SSL certificate for your domain name, so make sure to turn on HTTPS availability.
- After HTTPS is available to your domain name, enable HTTPS redirect. It will redirect all your visitors to the HTTPS pages.

HTTPS availability will take some time (Usually 1-2 hours). During that time you will not be able to see your Blogspot website.
All Blogspot settings for custom domains are complete.
After connecting the custom domain, you may see a Parked Domain page while visiting your website. This is a common problem.
You can see the solution to the Parked domain problem here.
Also read, How to connect Custom Subdomain with Blogspot
FAQs
Should I submit my domain URL in Search Console after adding a custom domain?
Yes, you should submit your domain in Search Console after connecting a custom domain.
You just have to log in to the Search Console and add the property. As your domain is on Blogger, it will get auto verified.
Is there any limit on how many blogs can be written on Blogger?
No, there isn't any limit on the number of posts. But, I guess there's a limit (about 100 per admin) to daily post publish, to avoid spammy behavior.
Will my Blogspot blog redirect after connecting the custom domain?
Yes, traffic to your Blogspot sub-domain will get redirected to the custom domain.
Can I create multiple Blogs with the same domain?
Yes, you can. But, all your domains will be different subdomains under the main domain, like blog.yourdomain.com, games.yourdomain.com, etc.
If you still face any other problems, then you can comment about them. I will help you out.