This article will share how you can point your Blogspot website on a subdomain of your custom domain name. After reading this article, you can create multiple websites from a single domain under different subdomains.
For example, this blogspot website is connected with www.innateblogger.com. If I want, I can connect my other Blogspot blogs with different subdomains like blog.innateblogger.com, example.innateblogger.com, etc.

Using subdomains for different blogs can be very useful. Even if you are a beginner, it will be helpful in the future.
So, let's get started.
What is a SubDomain
A Subdomain is an additional part of your domain name. It's also called third-level domains. Generally, Subdomains are used for organizing different sections of a website.
When you create a new blog on Blogger, your blog points to a unique subdomain under the main blogspot.com domain name.
Let's say your Blogspot blog address is example.blogspot.com.
Here,
- .com is a Top-Level Domain (TLD).
- blogspot is a Second-Level Domain (SLD).
- example is the Subdomain.
The most commonly used Subdomain is www. Even this website also points to www.innateblogger.com.
But, if I want, I can connect my other Blogspot blogs with different subdomains like Demo.innateblogger.com.
How to Setup Custom Subdomain on Blogspot Blog
Connecting a subdomain is very simple and easy. First, you need to add the desired subdomain name as a CNAME in your domain's DNS settings and then connect it with your Blogspot blog.
If one of your Blogspot sites is already connected with a custom domain name, then you already have half of the work done.
In case you didn't connect a custom domain name with your blog, then you can check our detailed guide on how to connect a Blogspot site with a custom domain.
After connecting one of your Blogspot websites with a custom domain, just follow these steps to set up custom subdomains on different blogs.
Add CNAME record
First, you need to log in to your domain registrar account and then go to the DNS settings of the custom domain you purchased and connect with another Blogspot website.
Now, you have to add another CNAME record that points to ghs.google.com. In place of Host (Name), enter your desired subdomain name.

You can enter anything, but keep in mind that if you enter blog in place of your hostname, then your new blog's URL will be blog.yoursite.com.
Connect Subdomain on Blogger
After adding the CNAME record, log in to your Blogger account. Select the blog you want to connect with the custom subdomain.
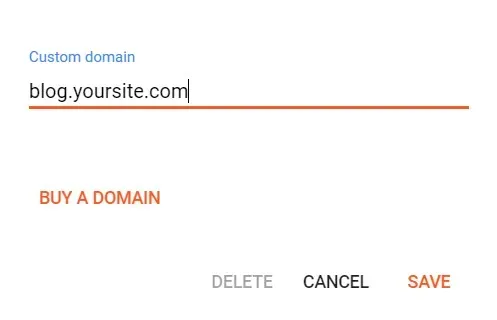
Go to the custom domain option in settings, and write the new domain name, like blog.yoursite.com. After that save the settings.

And that's it. Your new Blogspot website is now on a custom subdomain. Also, turn on the HTTPS availability option for the new subdomain.
Make sure to use the same blogger ID that you used for connecting the first custom domain in one of the Blogspot blogs.
How to Connect Subdomain with Blogger when the main domain is connected with WordPress Hosting
What if you bought paid hosting, and connected your main domain with the paid hosting, is it possible to connect subdomains of that website with Blogspot?
The answer is yes, and you can easily do that. The steps are exactly as connecting Custom Domain with Blogspot blog. Just make sure you don't enter the main domain (like www) address while connecting your subdomain with Blogger.
You will also get a free SSL certificate for that subdomain, so don't forget to turn on HTTPS on Blogger settings after connecting the custom subdomain.
While you connect a subdomain with Blogspot blog by changing DNS, then your main domain (connected to WordPress hosting or similar) will be unreachable for some time.
Conclusion
Like I said before, connecting a custom subdomain on Blogspot websites is very simple. I am sure that you won't need any other guides for creating and setting up custom subdomains on Blogger.
Still, if you face any issues, don't hesitate to comment.